How to verify that you own the domain you just connected to your Twice store
Before your own domain can be used, we need to verify that you own this domain, and point the domain to your Twice store. Twice cannot do this automatically, so you as the domain owner are required to do the needed changes to the domain’s DNS records in your domain provider’s settings. The following sections will guide you through adding these records, depending on the type of domain you are connecting.
Note: Custom domains use our company name Rentle, not Twice.
On this page:
After your domain has been verified
Verify your domain
Verifying a subdomain
- Log in to your account on your domain provider’s website
- Find the DNS settings or domain management area.
- Add (or update) the CNAME record of the subdomain that you want to use and point it to rentle.club.
You don’t need to change the TTL number in your DNS settings, but can use the default value.
Verifying the main domain
When connecting the main domain, you can select between Basic and Advanced Setup.
The advanced Setup is intended for users that need to ensure that their main domain's redirection from non-www to www works also when the non-www domain is being accessed directly using HTTPS. For Advanced Setup, follow the instructions in Twice's Verify Domain view. You can also read more about setting up the root domain HTTPS redirection.
Basic Setup: To verify and connect your main domain, you will need to:
- Log in to your account on your domain provider’s website
- Find the DNS settings or domain management area.
- Delete all your A records with @ key. Delete all existing AAA records with @ key.
- Add (or update) the 2 records (order does not matter) you can find from the verification screen:
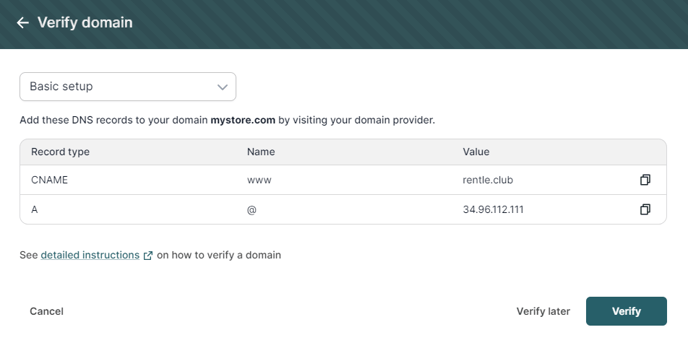
Note: You don’t need to change the TTL number in your DNS settings but can use the default value.
Complete the verification
Once you have updated the DNS records for your sub or main domain, click “Verify” in the Verify Domain modal. Twice will verify the added DNS records, and make sure they are correct. If the verification is successful, the domain will be added to the list of your domains, and we will finalize the verification and automatically secure the domain with an SSL certificate.
Domain verification failed, what should I do?
The domain verification can fail for a few reasons. In case of verification failure, we will display an error message that should guide you to fix the issues. You can also read our Most common domain verification errors and pitfalls guide for help.
Updating the DNS records can take some time, especially if there are existing DNS records that you need to replace. Even if the changes have been made in the DNS settings, it might take from minutes to days for the details to get updated (depending on your DNS settings). If you did update the records but are still seeing errors, you can also click the “Verify later” action to verify the domain later.
After your domain has been verified
After your domain verification successfully passed, your domain will be visible in your domains list. The domain might still be in the “Verifying” state. Finalizing the domain verification might take up to a few hours, but there are no actions needed to be done on your side anymore. What is done in this step are:
- Your domain goes through another verification to make sure that we can establish a safe connection
-
We provide you with an SSL certificate, which is represented by the padlock displayed next to the domain name. This guarantees that the communication between your customers and our service is secured.
Experiencing trouble when setting up your custom domain?
We've collected some common errors and pitfalls in this article -->